I remember opening my laptop every time and finding my desktop covered in random icons, half-finished downloads, and screenshots. I forgot to delete them. One weekend I decided to fix it for good, and iTop Easy Desktop turned that cluttered mess into the clean, personalized workspace I had been wishing for so long.
What My Desktop Looked Like Before?
Before I started, my desktop was basically a junk drawer. Icons were scattered everywhere with no logic to where anything sat. Screenshots piled up next to work documents. Random installers I downloaded once and forgot about sat right on top of everything else. Every video call meant a scramble to hide it all before sharing my screen.
I did not need new hardware or a fresh Windows install. I needed a system, and that is exactly what this desktop organizer software turned out to be.
Why I Chose iTop Easy Desktop
A few things sealed the decision for me.
- It automatically organizes desktop icons, files, and folders based on rules I set, instantly freeing up space.
- It includes over 20,000 wallpapers, including dynamic HD options so I could actually design a desktop that felt like mine.
- It comes with an AI assistant for reminders, chat, and quick search help.
- It has a Private Box feature that locks sensitive files behind a password.
- It bundles useful widgets like weather, a clock, a calendar, and a Pomodoro timer.
That combination of organization tools and personalization options is what made it feel less like a utility and more like a full workspace builder.
Building My Dream Setup, Step by Step
Here is exactly how I went from chaos to a workspace I actually enjoy looking at.
Step 1: Download and Install
I went to the official website and clicked Free Download. The installer is small, so installation process finished in under a minute. I clicked Open to run the installer, chose a destination folder, then clicked install now. Within seconds, installation was complete.
Step 2: Auto Organize My Desktop
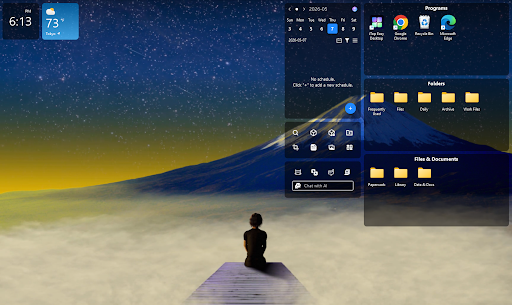
I opened the app and enabled boxes. iTop Easy Desktop instantly scanned my messy desktop and grouped everything into preset boxes like Programs, Folders and Documents. Within moments, my cluttered screen turned into a handful of neat, labeled groups.
Step 3: Create Custom Boxes for My Own Categories
Though the preset boxes are great but I wanted more control. The best thing, it has features to create manually as well. I right-clicked my desktop and selected Create Box then chose between List Mode, which displays files like Windows Explorer with columns, and Tab Mode, which creates browser-style tabs for switching between file groups. I made separate boxes for work documents, personal files, downloads, and screenshots, then dragged my scattered files into each one.
Step 4: Choose a Live or Static Wallpaper
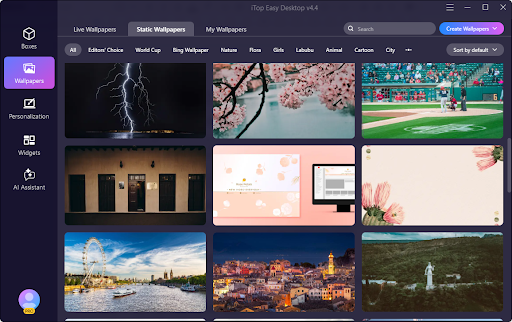
After the clutter was gone. I moved on to the fun part. This tool has thousands of backgrounds, I opened the Wallpaper icon and browsed the Live Wallpapers section that brings the desktop to life through movement and depth. I tested a few animated scenes before settling on one that felt calm enough not to distract me during work.
For days when I want something simpler, I switch over to the Static Wallpapers tab instead, since not everyone wants constant motion on their screen.
Step 5: Upload My Own Designs
I also had a few personal photos and design mockups saved locally that I wanted to use. Through the Upload Wallpapers option, I imported those images directly into iTop Easy Desktop, so my desktop background could rotate between the built in library and my own creations.
Step 6: Personalize Beyond the Wallpaper
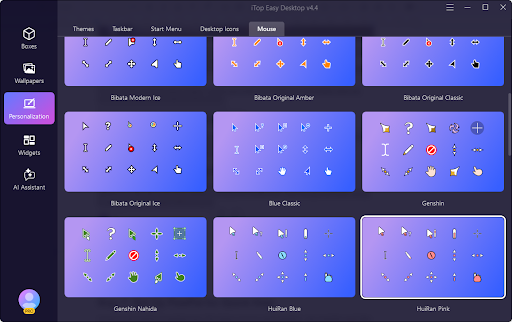
I opened the Personalization center and adjusted the taskbar style and tweaked the Start menu appearance. After this customized desktop icon styles for a better look. I also changed my cursor styling; though it sounds minor, but it still looks great.
Step 7: Set Up PawPal for Quick Help
I turned on the AI assistant next. This feature answers quick questions, sets reminders, and helps me search for files without digging everything manually.
Step 8: Lock Away Sensitive Files
For anything private, like tax documents or client files, I created a Private Box and set a password on it. Now those files are hidden from view and protected, instead of sitting exposed on my desktop like everything else used to be.
Step 9: Add Widgets for Daily Use
iTop Easy Desktop includes handy built-in gadgets like Schedule, iNotes, Clock, Weather, Quick Tools, and iPomodoro to help me manage daily tasks and boost productivity right from my desktop. I can easily toggle these desktop widgets on or off to create a clean, personalized workspace tailored to my workflow.
Step 10: Set Up Quick Hide for Meetings
The last touch was enabling double-click hide. Before video calls or screen sharing. Now I just double click the desktop and every icon disappears instantly, leaving only the wallpaper visible. After Double-clicking again brings everything comes back exactly where it was.
What My Desktop Looks Like Now?
My desktop went from a scattered mess to a workspace that I love. Files are grouped logically. My wallpaper changes based on my mood. Sensitive documents stay locked away and I no longer panic before sharing my screen on a call.
Building this habit took a single weekend, but I still spend a few minutes each week dragging new files into their boxes so the clutter never comes back.
If your desktop has slowly turned into the same kind of mess mine was, iTop Easy Desktop is worth trying before you resign yourself to scrolling past hundreds of icons every day. Sometimes the fix for a messy digital life is not more storage or a new laptop just better organization from the start.